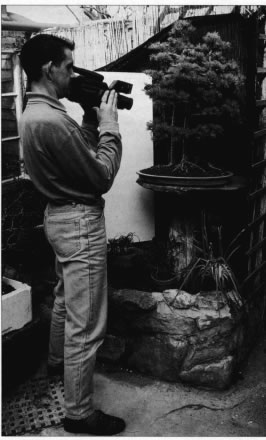
Still photographs are generally accepted to be the best way to record the progress of a tree from initial training to maturity. They also assist in the planning of future changes in the design. Video can be a more appealing method of displaying the advances of your designs. The three dimensional quality of a tree can be much better represented. Place it on a turntable and slowly revolve it or simply walk around the tree.
Video is a huge subject that is covered in great detail in many books. This article will concentrate on the aspects of greatest importance to bonsai enthusiasts.
Tomorrow's Technology
As bonsai are a long term project it may seem a bit silly to commit your record to an "old fashioned technology" like VHS tape. The VHS system won't be in use much in ten years time. There's no need to worry about it becoming out of date though. There will always be an option to convert the VHS tapes of today onto the digital formats of the future. An hour of VHS can be converted onto CDRom for £45 today and this technology will reduce in price in the future. It won't be long before anyone can download video directly onto their PC's hard drive for digital storage and editing. This means no quality loss and the ability to edit and re-edit to your heart's content. Titling and video effects such as fades, wipes and any of the other fancy transitions used between scenes on TV can be performed by software on the PC also. The hardware to do this in television studios used to cost hundreds of thousands of pounds and now it is available to the amateur for a few hundred.
Equipment
A simple fully automatic camcorder can give you satisfactory results for record keeping purposes. They also tend to appeal to people who are a bit afraid of the technology involved. Gimmicks such as colour viewfinders (add to the cost and do nothing for the footage quality) and auto stabilisation of wobbly shots (averaging the pictures between shots causing loss of clarity) should be avoided. If you wish to achieve a good standard in your videography, some research and investment in a good quality system is advisable. Hi8 or Compact SVHS will provide better quality pictures than VHS, compactVHS or Video8. The advantage with full sized VHS is that it can be replayed directly on your video recorder. "What Camcorder" and "Which" magazine provide good advice on the formats and camcorders. It may be worth considering the new domestic digital camcorders.
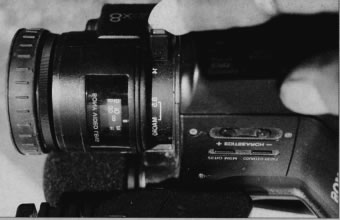
A video camera that allows you to switch off the autofocus is a must. There is no greater distraction than a picture which constantly loses and regains focus. It does this as the automated system "hunts" for the point on which you wish it to focus. When videoing a tree (especially a deciduous one without leaves) the point to focus on is likely to alter dramatically as you move the camera. Amateurish "autofocus hunting" is easy to avoid. With outofocus turned off, simply focus the camcorder with the ring on the lens barrel prior to recording. Remember that every time you change shot, the focus will be lost and must be adjusted again. This is a small price to pay for shots that remain sharp.
Lighting
Sunlight can be used for record keeping shots and, with practice, some very good results obtained. Direct sunlight tends to be harsh and will produce strong shadows. A slightly hazy or lightly cloudy day will give better results. Alternatively the tree can be placed in a partly shaded area and the lighting controlled by "bouncing" sunlight off a suitable surface. This bounce board may be a white bed-sheet, a large white card, a sheet of polystyrene, silver foil or a purpose made reflector bought from a good photography shop.
Supplementary lighting can be provided with spotlights, extension lamps etc but the light will be of a different colour than sunlight. See white balance.
Specialist video lamps are available but can be expensive. Always take great care that any lamp is far enough away from the tree to avoid scorching. Powerful lamps throw their heat a good distance and can easily cause crisped leaves.
White balance
A video camera cannot tell what white is until it knows the colour temperature of the light. All colours will be recorded incorrectly if the white balance is not set. Daylight is blue, evening sunlight is orange, fluorescent lights are blue, tungsten lights are orange. This is why most video cameras have white balance controls. If yours is manual you must make certain that the white balance is set by pressing the appropriate button while filming anything white. Once set, the camera will record all colours correctly until the lighting conditions change. 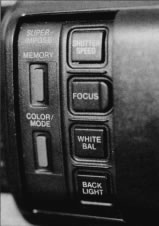
Backgrounds
The background is often given little or no thought and is a common cause of poor video. Make certain that there is nothing distracting, such as a brightly coloured object that will attract your eye away from the intended subject. Neutral backgrounds should be arranged wherever possible. A colour which complements without distracting or camouflaging is ideal. Sometimes a lighter or darker natural background can be used, especially if careful lighting and selective focus is employed (using a limited depth of field to throw the background out of focus). Some suitable backgrounds - a plain sheet of fabric, split bamboo fencing or blinds, a rendered wall, an emulsioned wall, a large sheet of hardboard, cardboard or coloured board from an art shop.
Composition
Always film the entire tree in a "wide" shot before taking closer shots to show detail. Take the video with the camera at the ideal height for viewing the particular tree. Try to make the positioning of the tree within the frame interesting and appearing "balanced". Don't allow any part of the tree to come to the edge of the screen, ie. leave a "margin" all around the edge. This avoids it appearing confined.
Depth of field
More light allows a smaller aperture and therefore a greater depth of field (distance which is in focus). This is useful for macro or detail shots. In lower light levels or when you deliberately use a larger aperture, the depth of field will decrease which can be used to throw the background out of focus and blur anything there that is distracting.
Tripods V Hand Held
The vast majority of shots can be improved by the use of a tripod. The best rule is to always use a tripod if one is available. A monopod is lighter, smaller, cheaper and more convenient for rapid setup and shooting at a variety of locations but the stability of the camera is not quite as good as that achieved with a good tripod. Maintaining the camera's correct horizontal position can prove difficult with a monopod.
As with all other equipment, buy the best that you can afford. An expensive fluid head on the top of a tripod allows for very smooth pans and tilts. A fluid effect head is a cheaper and less effective mount for the camera. A stills photography tripod can sometimes be upgraded, if it is sufficiently sturdy, by buying a video head for it. 
In windy conditions hand holding becomes even more problematical than usual as the buffeting your body receives is transmitted to the camera and ruins the shot.
When no camera mount is available, look around for a suitable surface to rest the camera on. A bean bag can be specially made to allow for steadiness and a small degree of positioning. If there is nothing to rest the camera on, try leaning against a suitable support such as a wall, tree, car, bench, statue etc. to inhibit the body movement that naturally occurs and causes wobbly shots. Hold the camera with both hands (even if it is a lightweight palmcorder) and tuck your elbows in. This braces the upper body and helps stability. For a short zoom shot it may help to take a deep breath before pressing the button and then holding your breath for the entire shot. The camera wobble will be much less noticeable while the lens is on wide angle. When zoomed in, the slightest movement is magnified and the shot can become totally unacceptable.

Where no other support is available you can use a chair. Place it with the back facing the subject and straddle it before sitting down. Place your elbows on the chair back so that the camera is now supported on a tripod like brace.
The procedure for purely hand held shots, when necessary, are as follows:-
Basic position
Stand with feet apart and make sure that your position is balanced and comfortable. Keep your elbows as close to your body as possible without hunching your shoulders. Avoid tensing up as this tires the muscles and can make your body tremor which ruins the shot. Relax for a while whenever you sense that this is happening. If you have to pan without a tripod use the following technique. Stand with your body facing the finishing point and feet spread about 30cm or 1' apart. Twist your upper body to allow the start of the pan and begin recording. Unwind your body as gently as possible and finish by holding the shot smoothly on the subject for a few seconds.
Composition
Always try to think like a stills photographer when shooting video.
Look for the best position to film from. Checking how the lighting will affect your shot can be difficult through the viewfinder. Experience is the key. Practice regularly and always review your footage, as soon after shooting as you can, so that the settings are fresh in your mind and any errors can be noted and avoided in future. Dramatic effects such as sunlight filtering through leaves or storm lighting creating dramatic sunrays and tree silhouettes can easily be miscalculated using the black and white viewfinder display. If you can use a colour TV wired to the camera, even a pocket sized portable, this is the ideal solution for evaluating shots.
Do not be tempted to use zoom and pan and tilt, during a shot, just for the sake of it. Camera movements have to be necessary to be effective. If used unnecessarily they distract and disorientate the viewer. It is much more important to use the zoom prior to filming to check which is the best framing for a particular shot. Always level up the camera on the tripod first.
Try to achieve balance in your shots. This is very subjective and difficult to define, especially if there is a lot of movement. A balanced shot has a settled or stable look to it. Unbalanced shots feel insecure and uncertain.
When you have a number of separate items in a shot, it can often be improved by giving a little thought to unity or grouping. The direction from which a shot is taken is often all that needs altering to achieve a more pleasing group.
Take close up shots showing details of interest on the particular tree being filmed - good rootage, flower or fruit, jins, branch arrangement from above and below etc.
Even if you produce poor results to start with, don't despair. The editing procedure, which you will no doubt want to learn one day, can save the best bits.
Don't just watch, analyse TV coverage on programmes like Gardener's World. Better still, record a programme and analyse it shot by shot. Ask yourself how the shots were achieved and why they were necessary.
As I said at the outset, video is a huge subject. I hope that this brief introduction to some of the crucial aspects can help. Keep practising and your results will improve.
All Text & Photographs © Kevin Bailey 1998 - 2008 |